Hexapod Using 8051
 |
| 8051 based Hexapod Robot |
A Hexapod is a six
legged robot which looks like a spider. I was giving presentation on 8051
microcontroller a student asked me ,”Can we make a hexapod using 8051 and
I said yes we can but he added that he searched on this topic on google
and was not able to find good information about it. He added that he found some
websites but they charge for it. So I decided to write a post on this topic.
This is the very first version of hexapod and have only one function to move in
the forward direction.
Now the very first
thing is the material we used to make this
project. The major
components are shown in the picture below.
components are shown in the picture below.
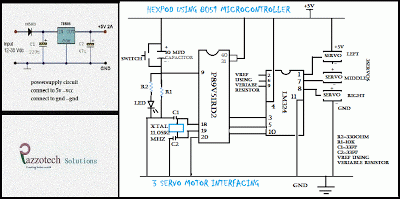
Control circuit:- The control circuit
of the hexapod is very easy to make and totally based on the 8051
microcontroller(p89v51rd2).
 |
| 8051 based hexapod control circuit |
The
Circuit Shown here is use to control the three servo motor's which
are subsequently connected to legs of the hexapod robot.
- · we already made the basic circuit of 8051
micrcontroller in our old posts so you can get the reference from
there. Clickhere for 8051 basic circuit and
description.
- · we also learn the lm324
interfacingwith 8051.
- · LM324 is uses because of its high gain
- · There
are different servos available in the market so you need to find out the pin
description of the motor you are using.
- · Inour motor’s the RED is for +ve, brown is for –ve and yellow is for data.
Now
you made the control circuit using 8051microconroller. you need to construct
the robot.
Construction of the
Hexapod: While you are
constructing the robot you need to use the step below very carefully.
** Join the three
motor’s in the manner as shown below.
 |
| paper clip while straightening them |
** For making front
and back leg bend the wire at 90degre angle and then one more bend at the low
edge as shown below.
**
Now join this legs to the motor gear as shown below.
**
Attach the legs to the motor’s and your robot is on its feet. As
shown below image.
Coding of hexapod: The
code of this hexapod is written in the embedded-c . you can also write it in
the assembly language. For writing the program you have to keep the rotation of
motor in your mind.
***************************************************************
***************************************************************
Hexapod Robot Using 8051 microcontroller
***************************************************************
***************************************************************
#include<reg51.h>
sbit right=P2^0; // Right motor data pin to P2.0
sbit middle=P2^1; // middle motor data pin to P2.1
sbit left=P2^2; // left motor data pin to P2.2
void timer(int msec) // Function for timer
{
int i;
for(i=0;i<msec;i++)
{
TMOD=0x20; // Mode2
TH1=-23;
//TH1= -23; // 200usec timer
TR1=1;
while(TF1==0);
TF1=0;
TR1=0;
}
}
void main()
{
int i;
right=left=middle=0; // make the pin as output
while(1)
{
for(i=0;i<20;i++) //middle leg clockwise direction
{
middle=1;
timer(20);
middle=0;
timer(360);
}
for(i=0;i<20;i++) //right leg forward direction
{
right=1;
timer(20);
right=0;
timer(360);
}
while(1)
{
for(i=0;i<20;i++) //middle leg anti clockwise direction
{
middle=1;
timer(40);
middle=0;
timer(360);
}
for(i=0;i<20;i++) //left leg clockwise direction
{
left=1;
timer(20);
left=0;
timer(360);
}
for(i=0;i<20;i++) //right leg anti clockwise direction
{
right=1;
timer(40);
right=0;
timer(360);
}
for(i=0;i<20;i++) //middle leg clockwise direction
{
middle=1;
timer(20);
middle=0;
timer(360);
}
for(i=0;i<20;i++) //left leg anti clockwise direction
{
left=1;
timer(40);
left=0;
timer(360);
}
for(i=0;i<20;i++) //right leg clockwise direction
{
right=1;
timer(20);
right=0;
timer(360);
}
}
}
}
NOW WATCH THE VIDEO...
*********************************************************************************
we will welcome your suggestion and projects suggest your project and we will try to post them on our blogs as soon as possible.
*********************************************************************************
*********************************************************************************
***********************THANK YOU FOR WATCHING **********************
******************************* BEST OF LUCK ******************************
*********************************************************************************
*********************************************************************************


0 comments:
Post a Comment